Hi Everyone
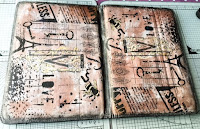
Today I fancied a little bit of a crafty lunchtime whilst waiting for the Italy v England rugby match to start (Six Nations Championship 2018). I wasn't sure what I was going to do until I looked on my coffee table, as I supped my coffee, and saw my old tablet cover which I was about to throw in the bin. So I thought okay if it turns out to be hideous I can just throw it in the rubbish and I haven't lost anything really. So that's the story now let me tell you what I did :)
I love, love, love, all my Imagination Crafts products but today I decided to use some of the wonderful rice paper together with Starlight Paints and Fabric Decoupage Glue. I love this glue as it makes the rice papers waterproof! Yes you read it right....waterproof. So you can use the rice papers with the glue and once completely dried it is washable. Imagine the things you can do with clothes, bags, etc!
Fabulous Stuff I Used
- Imagination Crafts Rice Paper - MA 006
- Imaginations Crafts Fabric Decoupage Glue
- Starlight Paints - Topaz, Rich Gold and Black
- Imagination Crafts Gesso - White
- Paints Brushes and Palette Knife
What I Did
Firstly, I painted the front and back of the tablet case with White Gesso. I used two thin coats allowing each layer to dry in between. I carefully dried with a heat tool.
Next I cut two pieces of rice paper to size. Then using the Rich Gold Starlight Paint and a small paintbrush, I coloured my chosen details on the rear of the rice paper design. When this was dry I added a wash over the whole piece with the Topaz watered down, leaving some white areas. Leave to dry.
Now it was time to glue the coloured rice paper to the tablet cover. As I was covering a larger area, I used my pallet knife to spread a thin layer of Fabric Decoupage Glue a small area at a time so that it didn't dry before I got to the next area. Carefully place the rice paper onto the glued area and smooth it down to remove any bubbles and ensure the edges are glued down. I worked my way up the covers. Then using a soft paintbrush I added a coat of the glue to the outside to seal it and left it to dry.
The last thing I did to my project was to add colour around the edges. I took the Starlight Paint in Black together with my domes bristle stencil brush and dabbed it around the edges. As I was going around I had a baby wipe in my hand so that I could smudge the paint using a damp finger giving a softer looking edge.
So now it is NOT going in the bin.....Yay! I love it. I hope you like it too.
I hope you have been inspired :)
Thanks
for
Popping By
MJ
xx


Gorgeous Mandy hugs Sand x
ReplyDeleteThis comment has been removed by the author.
DeleteThanks Sandra xx
ReplyDeleteBrilliant result
ReplyDeleteCarol x
Thanks for great comment Carol xx
DeleteI love that Mandy :)xxx
ReplyDeleteCheers Hun xx
Deleteits lovely.must do my phone case again as it looks the worse for wear
ReplyDelete