Wednesday 7 March 2018

Inspire Butterfly Canvas

Hi Everyone

Glorious sunshine here today I hope it stays that way too :)

Today I have an 'Inspire' canvas project.  I have used my Imagination Crafts goodies together with some of my crafty stash.  Basically, I got loads of bits and bobs out from my craft room and began playing!  Once again I must apologise for the poor quality phots. So let's get going :)


What I Did
  • Firstly, grab some bits and bobs from your crafty stash and decide what you are going to use to begin with.  I changed my mind as I went along as you can see. :)


  • I started by sticking a mix of cheesecloth, fabric, bead trim and lace strips down the centre of the canvas. Build up layers.  Then I added other embellishments including cut up CD's, wooden skewers, metal shapes, crystals, straws and wooden butterflies.  


  • Next take some crackle paste, and add it to some areas.  I lightly pasted onto canvas surrounding the composition, on the butterflies and straws.  I also pasted the crackle paste through a couple of stencils to add texture to background.  Leave to dry.


  • Once paste is dry, gesso over the entire canvas.  Dry.  Now add the first colour of Mix Media Ink spray in light blue, adding water to blend out.


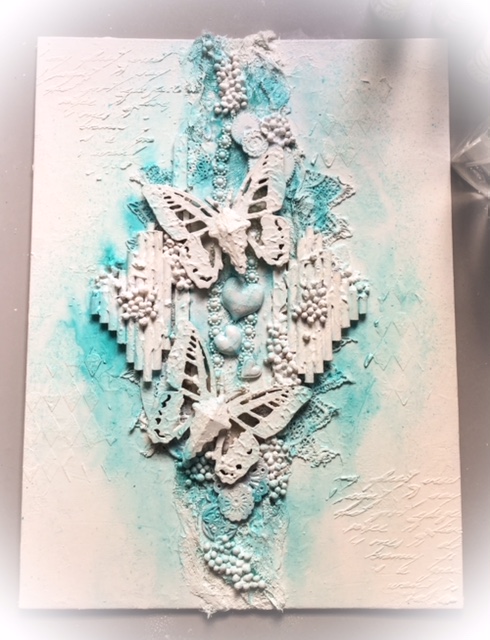
  • Continue with the next colour.  I used a mix of light green and blue sprays using the white to soften out.  Dry.


  • Next I added some Alchemy Wax in Bronze to pick up the texture details.


  • I finished the project off with an MDF word coloured with alchemy wax.


What I Used

Imagination Crafts Magibond Glue
Imagination Crafts Crackle Paste
Imagination Crafts Stencils - A4 Script and Harlequin
Imagination Crafts Mix Media Ink Sprays - Lt Blue, Blue, Lt Green and White
Cadence Mix Media Artsy Stones
Imagination Crafts Alchemy Wax - Bronze
Embellishments from my Crafty Stash


I hope you have been inspired.

Thanks
for
Popping By

MJ
xx

Monday 5 March 2018

Beautiful Florals Round Canvas

Hi Everyone

Today I have made a floral circle canvas project in colours that I don't normally go for!  I asked my friends to choose a colour scheme from a choice of five colour combos I gave them.  And the one it turned out to be, had shocking pink and teal in it.  I rummaged through my Imagination Crafts stuff and picked out the Mix Media Ink sprays.  This is my take on it.  So let's get going!


  • Start by grabbing book pages, white gesso and a background stencil


  • Tear the pages onto random pieces and glue onto the canvas.  Take the stencil and smooth through some structure paste in random areas.  Dry.


  • Next add some pieces of cheesecloth around the edges.  Dry.


  • Gather up a selection of embellishments and glue onto canvas to make the composition you like.


  • Add some Artsy Stones for extra texture and to fill gaps.  Using crackle paste, spread roughly with a pallet knife around the outside edge of canvas.  Leave to dry.


  • Next take white gesso and dry brush over the entire canvas and embellishments.  Dry.


  • Put together your colour pallet including a water spray.


  • Using the mix media ink spray in fuchsia, begin adding colour using white ink spray and water to soften the colour if needed.  I don't worry at this stage as later it will be dry brushed with white gesso.  Dry.

  • Add some light green to make some areas darker.  Dry.


  • The ink needs to be dry for the next stage to get best result.  Take the white gesso and start dry brushing over the canvas and embellishments.  Dry in between each coat and repeat until colour wanted is achieved.  


  • Once all the gesso dry brushing is done, add a few highlights using Starlights White Gold paint.  Add word to finish.


  • Viola!  C'est Fini :) 


What I Used

Imagination Crafts Fabric Decoupage Glue
Imagination Crafts Structure Paste
Imagination Crafts White Gesso
Imagination Crafts Crackle Paste
Imagination Crafts Artcutz - Leaves
Cadence Mixed Media Artsy Stones
Imagination Crafts Mix Media Ink Sprays - Fuchsia, Light Green and White
Imagination Crafts Starlight Paint - White Gold
Embellishments from my crafty stash


I hope you have been inspired.

Thanks
for
Popping By

MJ
xx


Sunday 4 March 2018

Precious Memories Altered Book

Hi Everyone

Yay!  Snow is being melted away by the rain!!  At least if I wanted to go out I could...lol 

So it's been another 'What can I find in the house to play with?'.  My BFF gave me a bag of books so I thought I'd play with one of them this afternoon.......and I did!  Lots of my Imagination Crafts goodies used for this project.  I apologise for the quality of the photos - the light was rubbish today and the paints are far more vibrant than they are showing themselves :(  Let's get going :)


What I Did
  • I took an old book and painted it with a couple of coats of white gesso.  Dried it. Then I stencilled some structure paste through my chosen designs.  Dried it and once again painted with gesso.  I also painted all my embellishments with the gesso.


  • Using Emerald Starlight Paint cover the book cover and most of the embellishments.  
  • Taking the white gesso, dry brush over the cover and embellishments.

  • Next add some sweeps of colour with Starlight Sax Blue.

  • Continue to add colour this time mixing a little gesso with Starlight Mint to give a soft pearl finish.

  • Add some stamped texture.  I used texture stamps with black and cobalt Archival Inks.

  • Start arranging the embellishments and gluing in position.


  • To colour the lace flowers I mix gesso and Starlight Mint paint together for a matt look.  Paint the flowers and dry.  Glue in position.  Paint the word chipboard with gesso and whilst wet add embossing powder over and heat.  Add highlights with Starlight Mint.

  • Use Starlight White Gold paint to lightly dry brush across the areas that need highlighting, building up the layers. Add gold to flower stamen and petal edges.

  • Using a small paint brush add some touches of Turquoise Sparkle Medium.  Leave to dry.

  • Voila!  C'est Fini :)


What I Used

Imagination Crafts White Gesso
Imagination Crafts Structure Paste
Imagination Crafts Art Stencils - Script and Butterfly
Imagination Crafts Starlight Paints - Emerald, Sax Blue, Mint and White Gold
Imagination Crafts Sparkle Medium - Turquoise
Imagination Crafts Art Stamps - Distress Set 2
Imagination Crafts Fabric Decoupage Glue


I hope you have been inspired.

Thanks
for 
Popping By

MJ
xx


Thursday 1 March 2018

Altered Bottle with Imagination Crafts

Hi Everyone

Well today I was stuck at home like a lot of people because of 'The Beast from the East'!  All I know is that it has been very cold and a great chance to do some crafting.  I had a bottle sat in the kitchen waiting for me to attack it and today was the day! 

So looking at my crafty stash I decided to use my ink sprays, pastes, stencils and bits and bobs.  So let's go.... :)


What I Did

  • Take a clean glass bottle and paint it with gesso.  I painted two coats, drying between each coat.

  • Using structure paste and a couple of stencils carefully smooth pasted through design.  Dry.


  • Next add some crackle paste to some areas of the bottle.  Leave to dry (the cracks are better if left to dry without a heat tool).


  • Choose some embellishments that you would like to use on the bottle.  Use a mixture of bits and bobs from your crafty stash (I used some Artcutz plus some wings made from a mould and structure paste together with some metal pieces).  I painted the chipboard pieces with gesso.


  • Decide on how you want your bottle decoration to look and begin gluing them into position.


  • Glue embellishments into place.  Using Fabric Decoupage Glue (fab thick glue) glue some of the Artsy Stones to add extra detail.  Leave to dry.  Then paint over the embellishments and Artsy Stones with white gesso.  Dry.


  • Now on to the fun bit - inks and Rusty Patinas!  Start by using the Turquoise and Light Blue Mix Media Ink Sprays, water and a baby wipe to blend the ink to a soft finish.  Take the pump out of the bottle and drop colour from this into some areas to darken.  Dry as you go.


  • Rusty Patinas - Rustique and Verdigris; use a small paintbrush to add some Rustique patina to small areas at a time.  Use water to blend and soften the colour.  Repeat until you are happy with the look of the bottle.  Paint over all the elements softening with the baby wipe as you go.  Add little touches of Verdigris patina by dry brushing.


  • For the final touches use Starlight Wax in White Gold to add highlights.
  • Voila!  C'est Fini :) 

What I Used

Imagination Crafts White Gesso
Imagination Crafts Structure Paste
Imagination Crafts Crackle Paste
Imagination Crafts Art Stencils - Weather Wash, Distressed Letter and Past Times 
Cadence Mix Media Artsy Stones
Imagination Crafts Mix Media Ink Sprays - Light Blue and Light Green
Imagination Crafts Rusty Patina - Rustique and Verdigris
Imagination Crafts Starlight Wax - White Gold
Imagination Crafts Fabric Decoupage Glue 
Imagination Crafts ArtCutz - Various
Embellishments - Crafty Stash


I hope you have been inspired.

Thanks
for 
Popping By

MJ
xx